How to Make the Best Blackstone Stir Fry
Ever crave a meal that’s faster than waiting for delivery but tastes like it came straight from a restaurant kitchen? Picture this: a sizzling Blackstone stir fry with tender chicken, crisp veggies, and chewy noodles all coming together on a hot griddle, blending into a dish that’s bursting with flavor. That’s the magic of mastering this recipe. No more soggy vegetables or bland takeout—just layers of texture and taste you control.
What makes this method stand out? It’s all about separating the components. Marinate your protein first to lock in juiciness. Then, cook your vegetables until they’re bright and crunchy. Finally, toss everything with perfectly cooked noodles. Each step builds depth, ensuring every bite feels balanced. And here’s the secret weapon: medium high heat. It creates that irresistible sear without burning, turning simple ingredients into something extraordinary.
This Blackstone stir fry guide walks you through choosing fresh ingredients, timing each stage, and adjusting flavors to your liking. You’ll learn why the griddle’s even surface distributes heat better than a standard pan, giving your meal a professional edge. Ready to ditch the takeout menu? Let’s get cooking.
Key Takeaways
- Separate cooking stages for chicken, vegetables, and noodles create layered flavors and textures.
- A griddle’s consistent heat ensures even cooking and restaurant-quality results.
- Marinating the chicken adds moisture and enhances its savory profile.
- Medium high heat is critical for achieving a caramelized sear without overcooking.
- This method outperforms takeout with fresher ingredients and customizable flavors.
Introduction to Blackstone Stir Fry
What if you could beat takeout at its own game? This Blackstone stir fry dish combines crisp-tender textures and bold flavors in ways most delivery options can’t match. By cooking components separately—protein, veggies, and noodles—you get control over texture and taste that’s nearly impossible in traditional takeout.

What Makes It Special?
The magic lies in building flavors layer by layer. Proteins marinate in a mix of soy sauce, garlic, and ginger, absorbing richness before hitting the heat. Vegetables cook just enough to stay vibrant, while noodles soak up the seasoned oils left behind. This method prevents sogginess and ensures every ingredient shines.
Why Use a Griddle?
A flat-top surface like the Blackstone griddle provides two critical advantages: consistent heat and room to multitask. Unlike cramped skillets, you can sear chicken on one zone while sautéing veggies on another, making your Blackstone stir fry efficient and flavorful. The even temperature prevents hotspots, so nothing burns or undercooks. Plus, the extra space lets you toss ingredients without overcrowding—key for achieving that ideal caramelized finish.
Balanced sauces tie everything together. A mix of soy sauce, rice vinegar, and a touch of honey adds tangy sweetness without overpowering. Ready to see how equipment and technique elevate this Blackstone stir fry meal? Let’s dive deeper.
Essential Ingredients and Tools
The foundation of any standout meal lies in the quality and preparation of its core components. For the best Blackstone stir fry, fresh ingredients and purpose-built tools transform simple recipes into memorable dishes. Let’s break down what you’ll need to build flavor and efficiency into every step.

Key Proteins and Vegetables
Start with lean proteins like chicken breast or shrimp—they absorb marinades quickly and cook evenly. For vegetables, choose crisp options: bell peppers snap with sweetness, broccoli florets hold their shape, and snow peas add satisfying crunch. Make sure to wash and dry greens thoroughly to prevent sogginess.
Uniform cuts matter. Slice carrots into matchsticks and onions into thin wedges so everything cooks at the same rate. This attention to detail saves time minutes later by avoiding half-raw pieces.
Must-Have Griddle Accessories
A great meal starts with the right gear. Use avocado oil for its high smoke point—it handles high heat without burning. Two spatulas let you flip proteins while stirring veggies simultaneously. A metal scraper keeps the cooking surface clean, ensuring consistent flavor transfer.
Make sure to pre-measure sauces and spices before heating the griddle. This prep step shaves off critical time minutes during active cooking. With everything within reach, you’ll maintain control over textures and doneness.
Preparing Your Blackstone Griddle
Your griddle’s performance hinges on one critical step: preheating. Like preheating an oven, this ensures even cooking and prevents sticking. Start by scrubbing the surface with a metal scraper to remove debris. A clean base lets heat distribute uniformly, eliminating odd flavors from old residue.

Preheating and Temperature Settings
Set burners to medium high and let the griddle warm for 10-15 minutes. Use an infrared thermometer to check for 425-450°F—the sweet spot for searing blackstone chicken while keeping veggies crisp. Too low, and ingredients steam instead of sizzle; too high, and oils burn.
When ready to cook, drizzle oil in thin lines. It should shimmer but not smoke. Spread proteins like blackstone chicken in a single layer, leaving space between pieces. This prevents crowding, which lowers the surface temperature and leads to uneven browning.
For fried rice or dishes where you add vegetables, work in batches. Toss veggies quickly over high heat to lock in crunch. If the griddle cools, pause cooking until it recovers to 400°F+. Hot zones? Rotate pans or shift ingredients to cooler areas to balance cooking speeds.
Maintaining medium high heat ensures proteins develop a golden crust without drying out. This method also works for fried rice, letting grains toast slightly while absorbing savory sauces. Remember: a well-preheated surface turns basic ingredients into restaurant-worthy meals.
Step-by-Step Blackstone Stir Fry Recipe
Transforming fresh ingredients into a restaurant-worthy meal starts with precision and timing. Follow these stages to build bold flavors while keeping textures distinct—no mushy greens or unevenly cooked proteins here.
Preparing the Protein
Slice boneless chicken into 1-inch strips for quick cooking. Whisk 3 tablespoons soy sauce with minced garlic, grated ginger, and a dash of sesame oil. Toss the meat in this mix, coating evenly. Let it sit 15 minutes—this infuses savory depth without over-tenderizing.
Cooking Components Separately
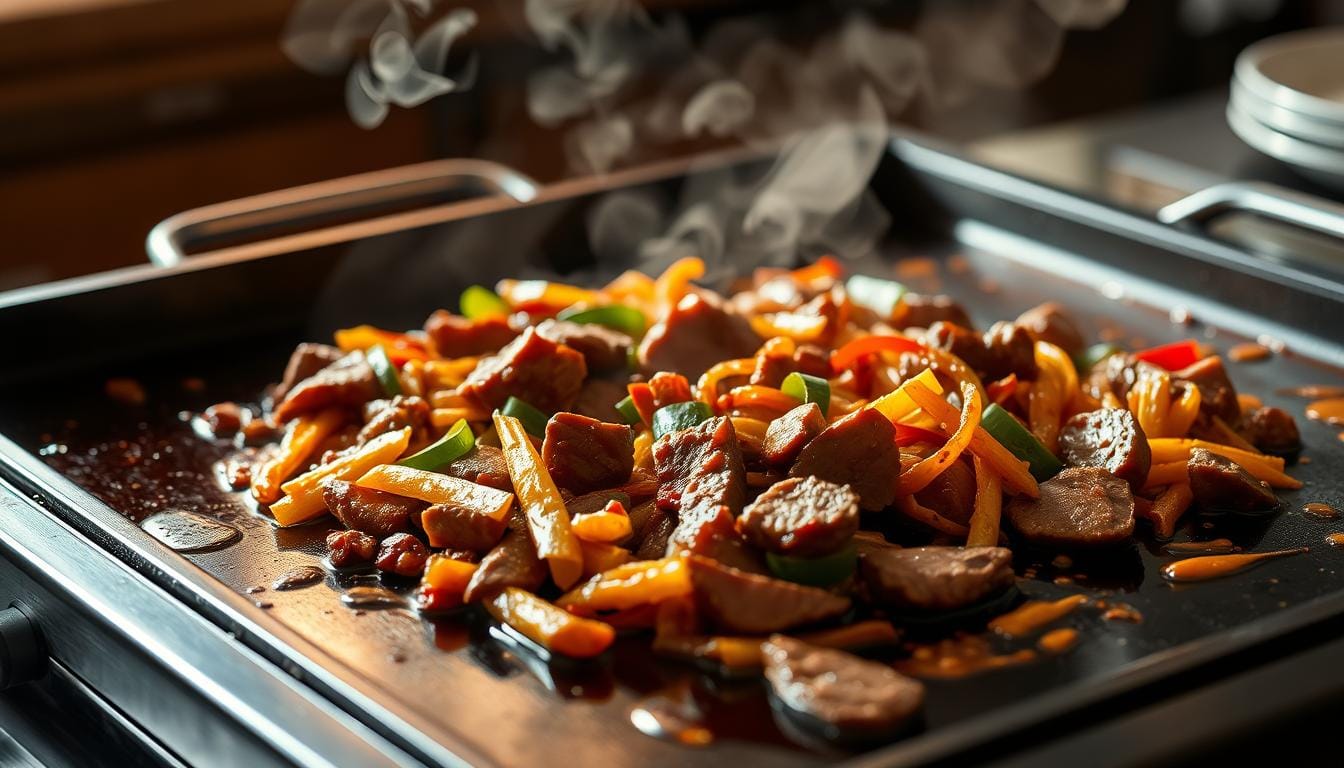
Heat your griddle to 400°F. Sear the chicken in a single layer until golden, then set aside. Add sliced bell peppers, carrots, and snap peas. Cook 2-3 minutes, stirring once—this keeps them crisp with light charring.
Push veggies to one side. Place pre-cooked noodles on the hot surface. Let them toast 30 seconds before tossing with tongs. Pour the reserved marinade and a splash of rice vinegar over everything. Keep moving the mixture for 1 minute—the sauce thickens, clinging to each strand.
Combine all elements just before serving. This preserves the chicken’s juiciness and the vegetables’ snap. Taste and adjust seasoning—a pinch of red pepper flakes adds heat if desired.
Tips for Making the Perfect Blackstone Stir Fry
Perfecting your technique turns good meals into unforgettable ones. Master these strategies to avoid common pitfalls and elevate every bite.
Ensuring Even Cooking
Uniform cuts are non-negotiable. Slice chicken and veggies into similar sizes so they cook at the same rate. Use avocado oil—its high smoke point prevents burning while creating a non-stick surface.
Rotate ingredients if your griddle has hotspots. Shift items from hotter zones to cooler areas using spatulas. This prevents charring and undercooked spots. Pro tip: Cook proteins and vegetables in batches to maintain control over textures.
Maintaining Medium High Heat
Keep the surface between 425-450°F. Too low, and moisture pools, making greens soggy. Too high, and oils break down. A quick test: flick water droplets onto the griddle. If they sizzle and vanish instantly, you’re ready.
Reapply oil in thin layers between batches. This minimizes sticking without drowning ingredients. Adjust burner knobs slightly if temperatures dip during cooking—consistency is key for that golden sear.
- Use an infrared thermometer to monitor heat zones
- Let the griddle recover temperature between batches
- Pat proteins dry before cooking to reduce steam
Navigating the Stir Fry Sauce and Seasonings
The secret to a standout dish often lies in its sauce—the glue that binds ingredients into a cohesive flavor experience. A well-crafted blend balances salty, sweet, and tangy notes while adapting to your texture preferences.
Creating a Balanced Teriyaki Sauce
Start with four core components: soy sauce for umami depth, sweet chili sauce for mild heat, fresh ginger for brightness, and oyster sauce for richness. Combine them in precise ratios to avoid overpowering any single element. Here’s a foolproof base:
| Ingredient | Role | Measurement |
|---|---|---|
| Soy Sauce | Salty backbone | 3 tbsp |
| Sweet Chili | Subtle sweetness | 2 tbsp |
| Grated Ginger | Zesty kick | 1 tsp |
| Oyster Sauce | Savory thickness | 1 tbsp |
Mix these with ¼ cup water or broth to thin the sauce. Simmer it briefly to meld flavors. Taste as you go—add honey for extra sweetness or rice vinegar for acidity.
Layering Flavors Effectively
Add sauces in stages. Start with soy to season proteins, then introduce sweeter elements once ingredients are nearly cooked. Finish with a drizzle of teriyaki glaze for shine. This method prevents flavors from muddying.
Adjust consistency by splashing in water 1 tsp at a time. Too thick? It’ll overpower delicate veggies. Too thin? It won’t cling to noodles or rice. Stir in cornstarch slurry (1:1 ratio with water) if needed, but sparingly—over-thickening creates a gloopy texture.
- Always measure liquids—eyeballing leads to imbalance
- Add ginger late to preserve its aromatic punch
- Let the sauce rest 5 minutes before using; flavors intensify
Griddle Versatility: Beyond Chicken Stir Fry
Why limit yourself to one protein when your griddle can handle so much more? Swap chicken for flank steak, shrimp, or even tofu to create entirely new flavor profiles. The same techniques that deliver juicy poultry work wonders with other proteins—just tweak timing and prep.
Exploring Beef and Other Proteins
Thinly sliced skirt steak cooks in under 4 minutes at 450°F, developing a smoky crust while staying tender. Chicken thighs need 6-7 minutes due to higher fat content. Cut all meats into 1.5-inch pieces for even cooking. Seafood? Large shrimp take 2-3 minutes per side—wait until they curl and turn pink.
| Protein | Prep | Cook Time | Key Tip |
|---|---|---|---|
| Flank Steak | Slice against grain | 3-4 minutes | High heat, no overcrowding |
| Chicken Thighs | Trim excess fat | 6-7 minutes | Flip once |
| Jumbo Shrimp | Pat dry | 2-3 minutes | Cook in single layer |
Marinate beef in soy sauce and brown sugar for 20 minutes to tenderize. For shrimp, a quick bowl toss with lime juice and chili powder adds zing. Always preheat your surface—cold zones lead to uneven results.
This adaptability extends to vegetarian options. Pressed tofu soaks up sauces faster than meat. Cube it, marinate 15 minutes, and sear 4-5 minutes per side. Pair with snap peas and mushrooms for a hearty plant-based meal.
Time-Saving Tips and Cooking Hacks
Short on time but craving a gourmet meal? These strategies streamline your cooking process without sacrificing flavor or texture. By optimizing your workflow and griddle space, you’ll cut prep time while keeping every step efficient.
Efficient Multi-Tasking Techniques
Divide your griddle into three zones: high heat for proteins, medium for veggies, and a warming area for cooked items. While chicken sears, toss broccoli in 2 tablespoons of oil on the cooler side. Use a timer to track each step—no more overcooked noodles or forgotten batches.
Scrape caramelized bits between tasks with a metal spatula. This maintains consistent heat distribution and prevents burnt flavors. Keep sauces pre-measured in small bowls (try 3 tablespoons soy sauce mixed with 1 tsp cornstarch) for instant access.
Prepping Ingredients Ahead of Time
Chop vegetables and marinate proteins the night before. Store them in labeled containers—this step saves 15 minutes during cooking. Pre-cook rice or noodles and refrigerate; they’ll crisp faster on the griddle later.
When ready to cook, layer flavor quickly: drizzle 1-2 tablespoons of sesame oil over veggies, then splash in sauces. This approach locks in taste while keeping the surface hot enough for perfect searing.
Understanding Cooking Temperatures and Techniques
Want total control over your meal’s texture and flavor? Mastering heat management transforms your grill into a precision tool. Proper techniques prevent limp vegetables and unevenly cooked proteins—common issues that plague takeout dishes.
Guidelines for Medium High Heat
Keep your surface between 425-450°F for optimal results. Use an infrared thermometer to verify zones. If temperatures drop below 400°F, pause cooking until the grill recovers. Pro tip: Close the lid between batches to trap heat.
Tips to Avoid Soggy Vegetables
High heat and speed are key. Toss greens in 1 tsp oil max—excess moisture steams them. Spread pieces in a single layer with space between. Stir once, then remove quickly. If they soften too fast, shift them to a cooler zone immediately.
Managing Griddle Hotspots
Rotate ingredients every 60 seconds using two spatulas. Create dedicated areas for proteins (hottest zone) and delicate veggies (medium heat). This mimics commercial kitchens’ workflow, giving your meal a takeout-beating crispness.
- Preheat 15 minutes for even heat distribution
- Pat proteins dry—water creates steam
- Cook leafy greens last; they wilt in seconds
Compare results: home-cooked dishes retain vibrant colors and crunch, while takeout often arrives steamed from packaging. Adjust burner knobs slightly during cooking—small changes keep your grill in the top performance range.
Enhancing Flavor with Custom Sauces and Garnishes
Transform your dish from familiar to extraordinary with creative sauce twists and eye-catching finishes. Small tweaks to seasonings and presentation can elevate even simple ingredients into restaurant-quality meals. Let’s explore how to personalize flavors and add visual flair.
Innovative Sauce Modifications
Swap traditional soy sauce bases for bold alternatives. Mix ¼ cup citrus juice with 2 tablespoons honey for tangy sweetness. Add chili paste (1-2 tablespoons) to boost heat without overpowering. Follow these instructions for balanced adjustments:
| Variation | Ingredients | Quantity |
|---|---|---|
| Citrus-Ginger | Orange juice, grated ginger | ½ cup + 1 tsp |
| Peanut-Sriracha | Peanut butter, lime zest | 3 tablespoons + 1 tbsp |
| Miso-Sesame | White miso, rice vinegar | ¼ cup + 2 tbsp |
Thicken sauces with a cornstarch slurry (1 tablespoon starch + ¼ cup water). For lighter options, use broth instead of oil. Taste as you go—balance is key.
Garnish and Serving Ideas
Top dishes with blanched broccoli florets for crunch and color. Sprinkle toasted sesame seeds or chopped cilantro for aroma. A drizzle of sriracha adds vibrant contrast. Serve over jasmine rice or crispy noodles for texture variety.
Pair spicy sauces with cooling toppings like cucumber slices. For instructions on timing, add garnishes just before serving to maintain freshness. These broccoli-heavy plates not only taste better—they look Instagram-ready.
Conclusion
Mastering this method gives you restaurant-quality results at home. By focusing on temperature control, fresh vegetables, and balanced sauces, every bite bursts with flavor. Remember: preheating your surface ensures crisp textures, while marinating proteins locks in moisture. A teaspoon of sugar in your sauce balances salty and tangy notes perfectly.
Keep portions manageable. Chop vegetables uniformly so they cook evenly—no half-raw carrots or mushy peppers. Layer sauces gradually, starting with 1-2 teaspoons of soy base before adding sweetness. These tips guarantee vibrant colors and satisfying crunch.
Don’t hesitate to experiment. Swap proteins or try new vegetable combinations like zucchini and mushrooms. Adjust spice levels with chili flakes or swap honey for sugar in glazes. Every tweak makes the dish uniquely yours.
Ready to impress? Share your creations online and tag friends who love bold flavors. With these tips, you’ll never settle for soggy takeout again.
FAQ
What makes Blackstone stir fry unique?
How long should I marinate chicken for stir fry?
How do I prevent vegetables from getting soggy?
Can I substitute teriyaki sauce with other flavors?
What’s the ideal temperature for cooking proteins?
Can I cook fried rice on the same griddle?
How do I manage uneven heat zones?
What proteins work besides chicken?
Can I prep ingredients ahead of time?
Did you like this recipe? Share your thoughts!
There are no reviews yet. Be the first one to write one.